ServerLIFT® data center lifts can be used to transport, position, install, and remove any of the IBM Power series of rack-mounted servers. In addition, the ServerLIFT®-brand EB2Z IBM Lift Tool is an approved, specified solution for handling and installing IBM Power Systems equipment.
Below, we’ve laid out precise instructions for installing an IBM Power Systems server using a ServerLIFT® machine in 4 simple steps. The steps are as follows:
- Loading the IBM Power Systems server onto the ServerLIFT® Lift Tool
- Moving the server to its destination within the data center
- Positioning the server for loading into the rack
- Loading, installing, and final placement in the rack
Because the EB2Z Lift Tool is ServerLIFT®-designed equipment, servers are fully supported throughout the installation process, which can be done quickly, safely, and efficiently with only one operator.
Quick Reminders Before Installing Your Server
Before we move ahead, a couple of quick reminders. IBM Power8, Power9, and enterprise server installation instructions generally call for two tools: a Phillips screwdriver and a flat-head screwdriver. It is also necessary to prepare the rack. First, identify a rack with (up to) four units of space. Plan to place heavier, larger units into the bottom of the rack. Plan to fill the bottom of the rack first, as a best practice for operator and equipment safety. Attach any necessary mounting hardware to the rack itself.
In addition, ensure you’ve gone through the proper setup for the EB2Z Lift Tool. Function tests, including the Stabilizer Brake, winch, and SmartTILT Platform™/Easy-Glide Shelf™ must be successful, as outlined in ServerLIFT® setup instructions.
If you are using an electric, one-touch motorized lift, make sure it is fully charged. Remove any objects or obstructions around or under the ServerLIFT® unit, and clear the path to the rack. All manuals with instructions for lift operation can be found ici. Finally, follow all electrostatic discharge instructions provided by the manufacturer.
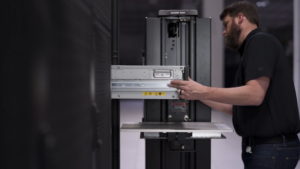
Step 1: Load the server for installation onto the lift
- Position the Lift Tool, placing it on level, even ground near your IBM Power Systems server.
- Engage the Stabilizer Brake by pressing down on the red pedal. This should lock into place, remaining in the down position and holding the Lift Tool in the same spot.*
- (If using a ServerLIFT®-brand electric lift tool such as the SL-500X® lift, power it ON by inserting the key and turning clockwise.)
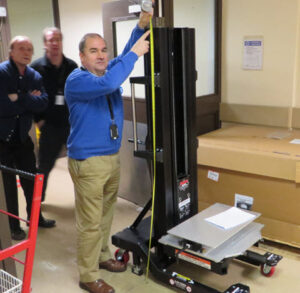
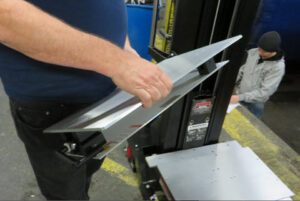
- Raise the platform to the desired loading height. Check to make sure the loading shelf is in the central, or neutral, position.
- Load the Power Systems server onto the Lift Tool’s equipment platform.
- Shift the server to the center of the platform so that weight is distributed evenly.
- Secure server using adjustable tie-down straps.*
Step 2: Move the server to the fully prepped rack
- Lower the Lift Tool platform to its lowest position.
- Release the Stabilizer Brake: press the green release pedal and allow pedals to return to UP positions.*
- Roll the Lift Tool until it is in front of (or to the side of) the correct rack.
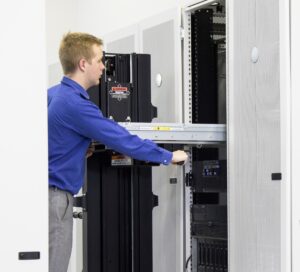
Step 3: Position the IBM Power Systems server for installation
- Engage the Stabilizer Brake by pressing down on the red Stabilizer Brake pedal. This should lock into place, remaining in the down position and holding the equipment Lift Tool in the same spot.*
- Raise the platform to the desired unloading height.
- Adjust the platform angle as desired for leveling the server side-to-side or rail-to-rail (the EB2Z Lift Tool uses a SmartTILT adjustment feature to accomplish this task).*
- Raise the platform to a height where the equipment nailheads are just above the installation rails.
- (If using a ServerLIFT®-brand electric lift tool such as the SL-500X® Lift, power it OFF by inserting the key and turning counter-clockwise.)
- Shift the Lift Tool’s platform shelf towards the rack and rails to provide support for the server into the rack.*
- Extend the rails out to line up with nailheads.
- Extend the slide rails forward until they click twice into place.
- Carefully lift the server and tilt it into position over the slide rails so that the rear nailheads on the server line up with the rear slots on the slide rails.(Note: the EB2Z Lift Tool and other ServerLIFT®-brand machines are the only lifts that include the RS-500XTM Rail Lift attachment to mechanically support the server at your desired tilt angle. If using the EB3Z Lift Tool or any other device, the operator will have to tilt and hold the server in place by hand for this step, which is not recommended.)
- Slide the server down until the rear nailheads slip into the two rear slots.
- Then, slowly lower the front of the server until the other nailheads slip into the other slots on the slide rails (again, by hand if using the EB3Z Lift Tool; or mechanically and safely with the RS-500XTM Rail Lift attachment if using the EB2Z Lift Tool or another ServerLIFT® device).
- Ensure that the front latch slides over the nailheads.
- Lift the blue release latches on the slide rails and push the server all the way into the rack until it clicks into place.
Step 4: Finish installation and prepare your Lift Tool for its next task
- Follow the instructions for cable-management arm installation (if required), cabling, and connecting expansion units.
- (If using a ServerLIFT®-brand electric lift tool such as the SL-500X® lift, power it ON by inserting the key and turning clockwise.)
 Lower the Lift Tool platform to its lowest position.
- (If using a ServerLIFT®-brand electric lift tool such as the SL-500X® lift, power it OFF by inserting the key and turning counter-clockwise.)
- Release the Stabilizer Brake: press the green release pedal and allow pedals to return to UP positions.*
- Roll the Lift Tool to its appropriate storage location.
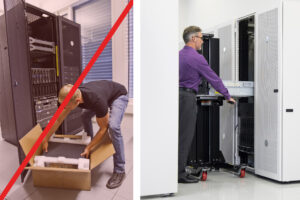
Don’t Take Shortcuts When Installing an IBM Power Systems Server
It is tempting to do the lifting manually with smaller servers. This is a dangerous risk; even a small tweak to the neck or back can put a data center team member out of commission for days. Manually lifting a server weighing above 50 pounds also directly contradicts federal safety regulations. If a manager is requiring you to regularly lift that amount of weight, this resource can be of assistance.

Also, there are three critical points to consider before selecting and purchasing a lifting tool for your data center.
- Purpose-built lifts are critical and essential safety tools for every data center and for all types and brands of rack-mounted servers, switches, PDUs, and other equipment—not just IBM Power Systems servers. Handling sensitive, expensive servers by hand is extremely dangerous to both the equipment and the operators. Yet, lifting and installing servers by hand remains, unfortunately, the status quo implication in most server manufacturer’s install instructions.
- While IBM only specifies/recommends manual hand-cranked Lift Tools (the EB2Z ServerLIFT®-brand data center lift model, and the EB3Z GenieLift-brand construction site lift), hand-cranked lifts should only be considered when handling servers very infrequently and only one or two servers at a time. That is because hand-cranking with any regularity is likely to put operators at serious risk of repetitive strain injuries.
- In light of point #2 above, ServerLIFT® analyzed dozens of data center operations when designing our product line. While our SL-350X® lift (the core component of the EB2Z Lift Tool) is the finest hand-cranked lift on the market, and the only one that is safety certified and designed for data center use, the SL-500X® One-Touch Electric Lift (or any of our other electric models) is our best all-around unit, and the one we recommend for most data center operations. These electric lifts take all the physicality out of day-to-day server-handling work, increase efficiency, and boost morale by ensuring technicians have the tools they need to do their best work.
Read more about how these two approaches (manual handling and utilization of a data center lift) differ drastically—and how social distancing can also be factored in—ici. We can also answer any additional questions about our lifts and which one best suits your needs in handling IBM Power Systems servers. We’re happy to be an advocate for you and for a culture of workplace safety.
Here are the applicable IBM Power Systems servers and their dimensions:
| System | Nom | Form Factor (U) | Depth/Length | Width | la taille | Weight (Max) |
| Power System S924 | IBM Power LC921 | 19” rack drawer (1U) | 822 mm (32.4 inches) | 441.5 mm (17.4 inches) | 43 mm (1.7 inches) | 13.38 kg (29.5 lbs) |
| Power System S924 | IBM Power LC922 | 19” rack drawer (2U) | 822 mm (32.4 inches) | 441.5 mm (17.4 inches) | 89 mm (3.5 inches) | 25 kg (56 lbs) |
| Power System S924 | IBM Power AC922 | 19” rack drawer (2U) | 845.0 mm (33.3 in.) | 441.5 mm (17.4 inches) | 86.0 mm (3.4 in.) | 30 kg (65 lbs.) |
| Power System S924 | IBM Power AC922 | 19” rack drawer (2U) | 845.0 mm (33.3 in.) | 441.5 mm (17.4 inches) | 86.0 mm (3.4 in.) | 30 kg (65 lbs.) |
| Power System S924 | IBM Power S914 | 19” rack drawer (2U) | 769.6 mm (30.3 in.) | 482 mm (18.97 in.) | 173.3 mm (6.8 in.) | 36.3 kg (80 lb) |
| Power System S924 | IBM Power S924 | 19” rack drawer (2U) | 769.6 mm (30.3 in.) | 482 mm (18.97 in.) | 173.3 mm (6.8 in.) | 39.9 kg (88 lb) |
| Power System S924 | IBM Power S922 | 19” rack drawer (2U) | 766.5 mm (30.2 in.) | 482 mm (18.97 in.) | 86.7 mm (3.4 in.) | 30.4 kg (67 lb) |
| Power System S924 | IBM Power L922 | 19” rack drawer (2U) | 766.5 mm (30.2 in.) | 482 mm (18.97 in.) | 86.7 mm (3.4 in.) | 30.4 kg (67 lb) |
| Power Enterprise System | E950 | 4U | 901.7 mm (35.5 in.) | 449 mm (17.6 in.) | 175 mm (6.9 in.) | 70.3 kg (155 lb) |
| Power Enterprise System | E980 System Control Unit | 2U | 779.7 mm (30.7 in.) | 445.6 mm (17.54 in.) | 86 mm (3.39 in.) | 22.7 kg (50 lbs) |
| Power Enterprise System | E980 System Node | 5U | 867 mm (34.13 in.) | 445.6 mm (17.54 in.) | 218 mm (8.58 in.) | 86.2 kg (190 lbs) |
| Power Enterprise System | E980 PCIe Expansion Drawer | 4U | 737 mm (30.7 in.) | 445.6 mm (17.54 in.) | 173 mm (6.8 in.) | 54.4 kg (120 lbs) |
| Power Enterprise System | IC922 | 2U | 820 mm (32.3 in.) | 436 mm (17.2 in.) | 86 mm (3.4 in.) | 30.9 kg (68 lbs) |
For more information on popular IT equipment models and specifications which are compatible with our ServerLIFT® machines, be sure to check out our new Server Database.